Showing posts with label DIY. Show all posts

Wednesday, October 24, 2012

Halloween DIY: $10 Tutu

Hey everyone!

I know in my last post I said I'd be posting more frequently, which I will, but it's kind of hard to get back into the swing of things!  Today's post is for all you last minute planners that are still looking for a Halloween costume, but don't want to break the bank making it!  I bought all of this last night, and the whole thing took about an hour and a half to make, which wasn't too bad.  For Halloween, my roommates and I decided we were going to be girls from "Toddlers and Tiaras," so I had to go buy materials to make a tutu.  There are tons of different costumes you can use a tutu for though, whether you want to be a ballerina, fairy, or anything else!  

Now, another big thing for me was that I didn't want to spend too much money on this costume.  I went to Hobby Lobby last night and got everything for under $10 to make the tutu.  Here's what you'll need:

1. An Elastic Band
I bought one that is 1 yard long and cut it to fit my waist.  They are $1-2 at Hobby Lobby, and come in all different sizes.
2. Tulle
I bought three different colored spools (pictured below) from Hobby Lobby.  They are 25 yards long (which is way more than you'll need), and are originally $3.99 each, but right now they're on sale for 50% off!
3. Scissors
4. Velcro, Safety Pin, Button, etc.
Anything to hold your tutu together at the back!


Here's how you do it!

First, start off your spools of tulle.  I used white, yellow and blue, but you can use as few or as many colors as you want.  Cut strips of each color.  Now I didn't use exact measurements for this, but I cut them about 2 feet long.  Depending on how tall you are, you can adjust this accordingly.  You're going to be folding each strip in half, so keep this in mind when cutting them.

Just to keep things more organized, I put each color strip into a pile.  The cutting takes the longest, so if you can pre cut some of your strips (I did about 10 of each color at a time), it saves a lot of time.


Now, you're going to take the strip you want to start with and fold it in half.


You can either tie it in a knot around your elastic band or loop it, I found it's easier to loop it around.  So, you're going to put the loop under the backside of the elastic, pull the long sides through the loop, and pull it tight.


Continue on with whatever color pattern you're using, and eventually you'll have this:


Now, either stitch on your velcro or button, or safety pin it in the back and you're done!  You're ready for Halloween!  


Remember--you can use ANY colors you want!  All I need now is a sash, crown and maybe a ni-ni to pull off the perfect Toddlers and Tiaras look for Halloween!

What are you being for Halloween?
Comment and let me know!

xo Sarah

Sunday, June 24, 2012

DIY Bracelet & Clutch: Recycle Old Accessories

Hey everyone!

LONG time, no blog, I know!! It's so weird but I feel like I'm busier in the summer than during the school year, with work and summer classes right now.  But, nonetheless, I've been a DIY crazed fool lately!  This is a simple one, since I'm trying to get a bunch of posts typed up today I thought I'd start out with a super easy way to recycle your old bags!  Since I've been home from college for the summer, I did a huge closet clean out.  I donated a ton of things, but some I held onto simply because I think I can make them into something else!  

I started with a super old purse.  I found this bag in my closet, which I've probably had since I was in elementary school. 

First, to make the bracelet, it's super easy.  All I did was cut the strap off the purse and tie the ends.  Then I fit it around my wrist and tied it together around my wrist.


Next, I took the actual bag part of the purse and sewed a button on the front.  Since my bag is a straw-like material to begin with, it was simple to fold the top of the bag over and stick the button through it.  If yours is a different material, you may have to cut a button hole.


Now you're done!  You've recycled your old bag and made some stylish accessories for the summertime!


I hope you all enjoyed!

xo Sarah

Tuesday, April 3, 2012

DIY: Easter Candle Holders--ft. Terra Cotta Pots


Hey everyone!  

Can you believe Easter is this Sunday?! This year is flying by, summer is so close to being here--it's completely crazy to me!  So, to honor the upcoming holiday (for those of you who celebrate), I'm going to show you these super cure candle holders, completely Easter themed!  They're super inexpensive and cute; you can make them for any holiday too!  I wish I could take the credit for the idea, but it actually came from my mom, aka the most artistic/crafty person in the world.  While I was home over spring break, this was one of our little projects :) I hope you all enjoy!

Here's the finished product:

The only things you'll need:

1. Four Terra Cotta Pots-- 4 for $1.99 at Michael's
2. Paint Brushes and Your favorite colored paints-- .50 cents each at Michaels
3. Any color ribbon you like
4. A glue gun
5. Fake Grass/Festive Figurines (optional)


Step 1: Paint your four pots a base color
(I chose yellow)

Step 2: Add your favorite design--anything you want!
First, I painted the rims of them purple

Then, I added a zigzag design and some dots on them


Step 3: Take two of the pots and glue the small bottoms of them together.  
Tie a ribbon around the middle to cover up the seam between the pots.


Step 4: Glue your candle into the pots, then glue some plastic grass into the pot around the candle.

Step 5: Add some fun figurines! :)
We just used parts that had broken off of old Easter decorations!

Now, you're done! 
You have an adorable center piece for the holiday!


I hope you all enjoyed!
If you try this make sure to let me know how it turned out! :)
Comment if you like the idea! 

xo Sarah
<3

My Links


Tuesday, March 13, 2012

DIY: Chalkboard Piggybank

Hey everybody!

Today I have a really cute Do It Yourself post on how to make a chalkboard piggybank.  Chalkboard paint has been all over the place lately; there's so much you can do with it!  So, when I went to Michael's Craft Store yesterday I had to pick some up.  Here's what we're making today:


All you'll need is:


A piggybank (Michaels has them three for $10!)
Chalkboard Paint ($.99 at Michaels!)
Chalk (any craft or grocery store probably has this!)
A brush--I used a foam brush :)


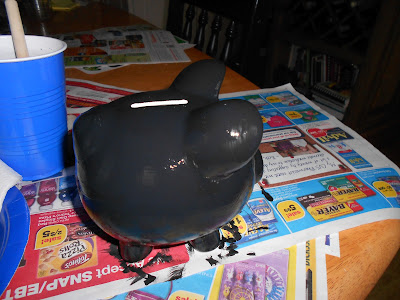
Step 1: Paint one coat on your piggy bank. 
The kind of chalkboard paint I used said to paint two coats, one vertical and one horizontal.
After 1 coat:

Step 2: Paint a second coat.
Make sure to leave about an hour between coats for the first to dry.  Paint this coat using horizontal strokes :)


Let your paint dry over night, just to make sure the chalk doesn't chip or stick when you try to draw on it.

After it dried, this is what mine looked like:

Now, decorate however you want and you're done! :)


That's it! It's super easy to make one of these, all you need is chalkboard paint, chalk and something to paint!  They will also make great presents! ( My cousin is about to have a baby and I'm thinking about making her one that says "college fund" ;) )  I hope you all enjoyed this post! :)

What do you use as a piggy bank?
Comment and let me know!

Follow me on here and on twitter for more updates?

xo Sarah
Other DIY's:


Sunday, February 26, 2012

DIY: Presents Fit for a Birthday Princess

Hey everyone!
So sorry for no blog post yesterday, but I had to clean and do homework after my best friend's Hannah's 19th birthday party.  She's the self-proclaimed princess (no, shes not a brat; just really funny!), so we had to give her a present fit for royalty!  It was super easy and inexpensive, and super cute.  Here it is:


It was really easy, all you'll need is:
1 cup or glass to decorate (I got mine at Michaels)
Letter Stickers (mine were purple and sparkly, but any kind you like!)
Ribbon 
Cute design stickers
Super glue

How-to:
First, make sure to take off any stickers on the glass.  Then, super glue on your letters and design in whatever pattern and order you want.  Even if they're already sticky, you should super glue them too; just to make sure they don't fall off.  Then, I wrapped and superglued three different ribbon colors around the stem of the glass.  Finally, I stuck a 19 on the back, since it's her 19th birthday.  

Like I said, super easy and it turns out really cute! Perfect for any girl on her birthday! :)  We also found this princess cupcake stand at Michael's, and I thought I'd include a picture, because it's so cute! 


What's the best homemade present you've ever received?
Comment and let me know! :)

Follow me on here for more updates?!
<3

xo Sarah

Tuesday, January 24, 2012

DIY: Flower Decor ft. Melting Crayons

Hey everyone!

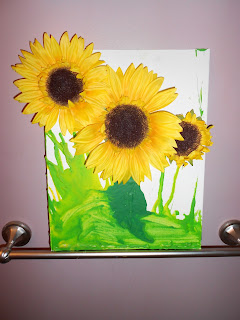
So, if you follow me on twitter, you know that I did a fun crafty DIY for my sister's birthday present.  Well, I finally gave it to her and here it is:

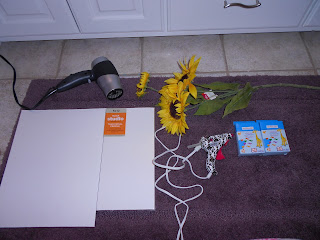
I got the idea off from here (Pinterest, of course!).  I used Sunflowers because they're my sister's favorite Here's what you'll need:

A Canvas (whatever size you want--Michael's has them!)
Fake Sunflowers-- $8.99 at Walmart
Glue gun
Hair dryer
Crayons- I got the cheapo kind because they're getting melted anyway :)

First, take all the "grassy" colored crayons; greens and yellows, and take off the wrapper.


Line them up along the end of your canvas that you want to be the grass and hot glue them on:


Take a hairdryer and melt the crayons down, however long you want the grass and stems:


Finally, cut your flowers off the stem and hot glue them onto your canvas:


And you're done! You have a creative new piece of wall art! :)  It's super easy, but also kind of messy, so make sure you melt the crayons over a trashcan.  Also, don't hold the hair dryer too close or you'll end up with melted crayon in your hair next time you use it (trust me...it happens!)

Other DIYs:


Hope you all enjoyed <3


Wednesday, January 4, 2012

DIY: Treasure Boxes

Hey everyone!

Today I've got a DIY on cute, small treasure boxes; so you can keep all your little treasures safe :)

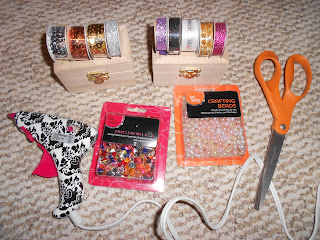
Here's What You'll Need:


Everything I got (except the scissors) is from Michael's. 
Wooden Treasure Box: $1 each
Mini Ribbon Rolls: $.99 each
Pack of little Gem Stones: $2.99
Pack of fake Pearls: $3.49

Start off with a plain wooden box:


To make the Gold/Pearl Treasure Box:


I started by gluing different sparkly gold ribbon and gold and bronze sequin ribbon around the top.  Then, I filled in the top with lots of different size and color fake pearls.  I put them all randomly on there, because I like the way it looks.  Then, I took some loose bronze and gold sequins and glued them on top of some of the pearls randomly.  Finally, I glued little pearls all over the bottom part of the "treasure chest'.  

To make the Glam Box:


I started by taking all kinds of sparkly ribbon-- silver, pink, purple and black-- and glued them along the top.  Then I put little gem stones around the top part of the box.  Then, I put pink and black sparkly ribbon around the top and bottom of the bottom part of the box, and put a sheer white ribbon with silver sparkles on it in the middle.  Lastly, I put small piles of gems all around, randomly placed, then, voila! You're done and you have a beautiful place to store your most beautiful treasures :)

Hope you enjoyed!
Follow me on twitter?

<3

Related Posts Plugin for WordPress, Blogger...