Showing posts with label crafts. Show all posts

Sunday, February 26, 2012

DIY: Presents Fit for a Birthday Princess

Hey everyone!
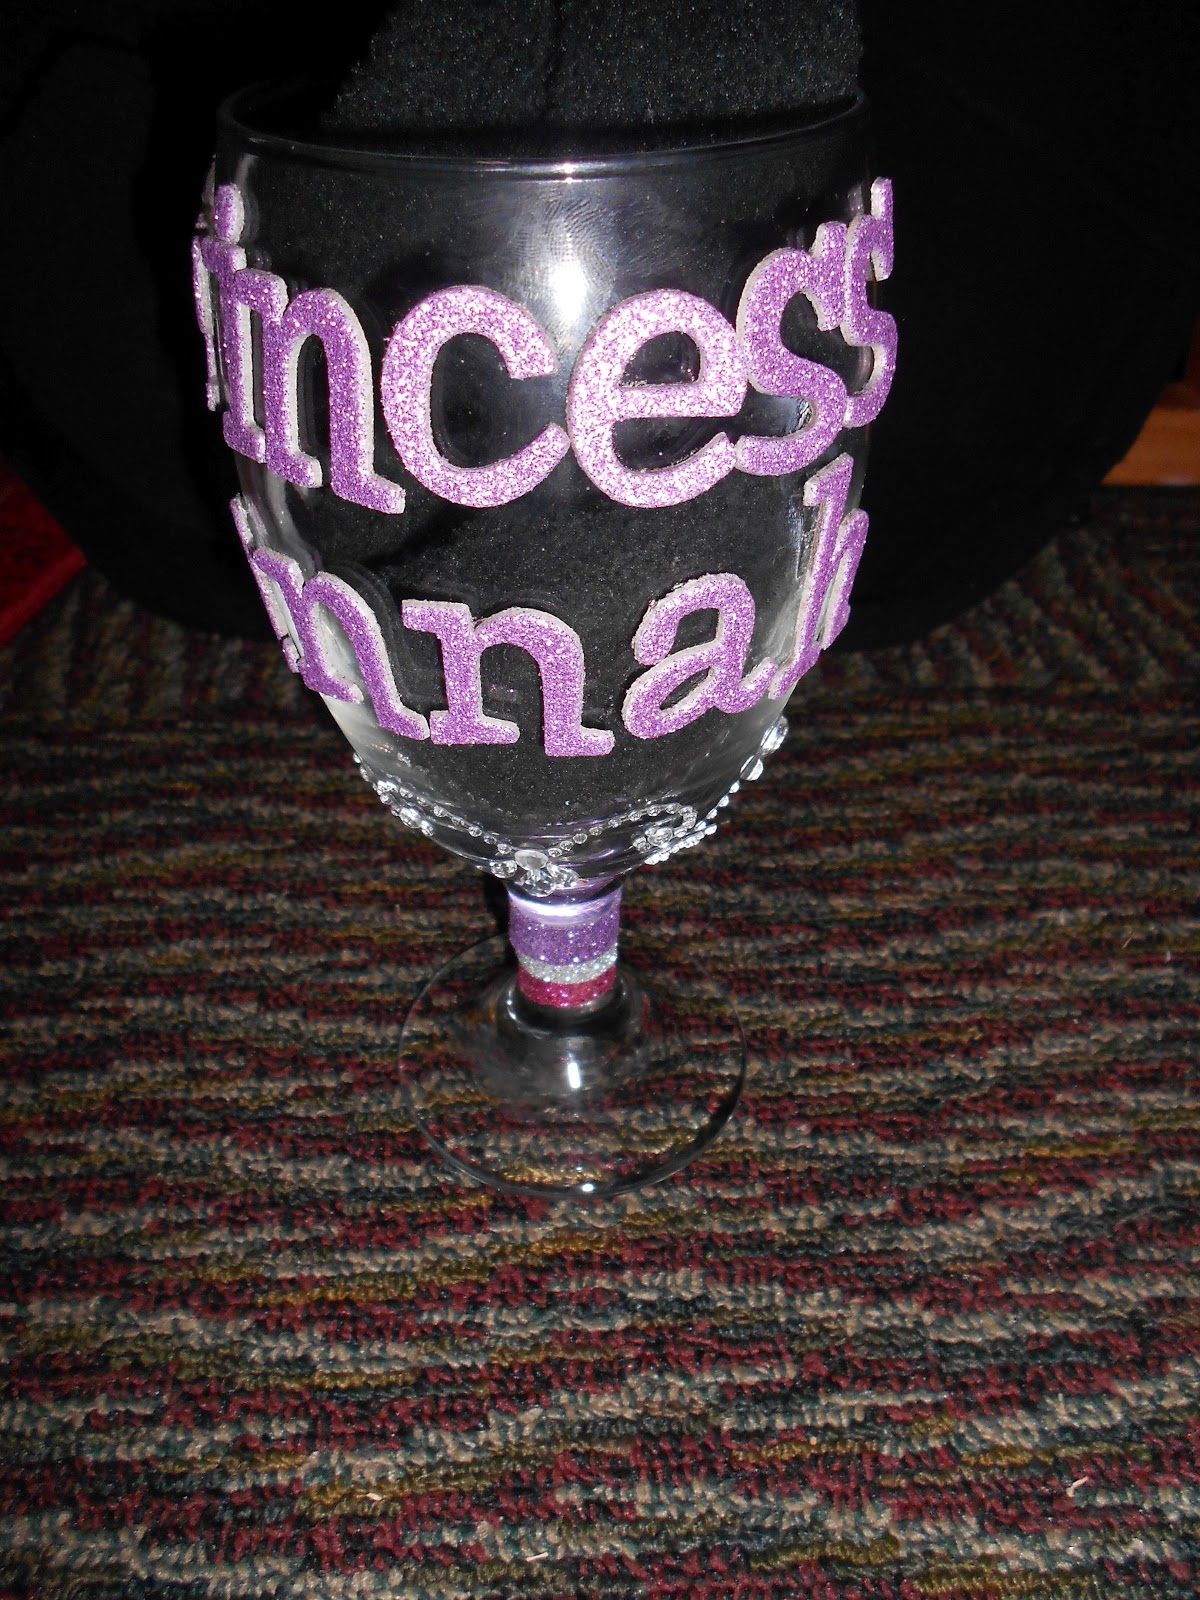
So sorry for no blog post yesterday, but I had to clean and do homework after my best friend's Hannah's 19th birthday party.  She's the self-proclaimed princess (no, shes not a brat; just really funny!), so we had to give her a present fit for royalty!  It was super easy and inexpensive, and super cute.  Here it is:


It was really easy, all you'll need is:
1 cup or glass to decorate (I got mine at Michaels)
Letter Stickers (mine were purple and sparkly, but any kind you like!)
Ribbon 
Cute design stickers
Super glue

How-to:
First, make sure to take off any stickers on the glass.  Then, super glue on your letters and design in whatever pattern and order you want.  Even if they're already sticky, you should super glue them too; just to make sure they don't fall off.  Then, I wrapped and superglued three different ribbon colors around the stem of the glass.  Finally, I stuck a 19 on the back, since it's her 19th birthday.  

Like I said, super easy and it turns out really cute! Perfect for any girl on her birthday! :)  We also found this princess cupcake stand at Michael's, and I thought I'd include a picture, because it's so cute! 


What's the best homemade present you've ever received?
Comment and let me know! :)

Follow me on here for more updates?!
<3

xo Sarah

Tuesday, January 24, 2012

DIY: Flower Decor ft. Melting Crayons

Hey everyone!

So, if you follow me on twitter, you know that I did a fun crafty DIY for my sister's birthday present.  Well, I finally gave it to her and here it is:

I got the idea off from here (Pinterest, of course!).  I used Sunflowers because they're my sister's favorite Here's what you'll need:

A Canvas (whatever size you want--Michael's has them!)
Fake Sunflowers-- $8.99 at Walmart
Glue gun
Hair dryer
Crayons- I got the cheapo kind because they're getting melted anyway :)

First, take all the "grassy" colored crayons; greens and yellows, and take off the wrapper.


Line them up along the end of your canvas that you want to be the grass and hot glue them on:


Take a hairdryer and melt the crayons down, however long you want the grass and stems:


Finally, cut your flowers off the stem and hot glue them onto your canvas:


And you're done! You have a creative new piece of wall art! :)  It's super easy, but also kind of messy, so make sure you melt the crayons over a trashcan.  Also, don't hold the hair dryer too close or you'll end up with melted crayon in your hair next time you use it (trust me...it happens!)

Other DIYs:


Hope you all enjoyed <3


Tuesday, January 3, 2012

I Took A Stained Glass Class!

Hey everybody!

So I'm super super excited about this post, because it's about something that is SO much fun! I went and took a stained glass class!! My mom's a painter, and the studio she paints at offers classes so my sister and I went and made them!  This is my "masterpiece":


My mom has done this many times, so we have tons of these lying around the house, she's made angels and doves, and hers look like this:

The class where I took it was $59 each, which sounds expensive, but for everything you get to do, it was worth it!  

Here's the steps:
First, you learn how to cut glass.  Then, you pick out what colors/design you want to do (my sister and I both did angels).  Next, you draw your design on the glass and cut it.  This was the hardest part for me.  Then you go to the grinder to grind down your sharp edges and even up the sides of the wings and the body, etc.  You also grind around the head to make it more square on the edges.  The next step is called "foiling".  You take this copper colored foil stuff and wrap it around the edges of each piece of glass.  You have to make sure you push it as tightly onto the glass as possible, because this is what the solder sticks to.  Then, you take a big paint brush and paint this gooey stuff around the edges.  Now comes the most fun part: Soldering! You let it all heat up then just take the solder and melt it all around the edges of your glass, putting the most where the pieces connect to each other (like the wings, body and head).  Then, you just windex off the glass and you're done!  
All together, this took about 2 hours, which sounds like a long time but actually it's so much fun that you don't even realize it! I want to go back to do another design soon!

I know this was a random post but it's so much fun I had to share :) Hope you enjoyed! :)

pretty please with candy and sugar and hugs on top? hehe

<3


Related Posts Plugin for WordPress, Blogger...